In my previous post, I explained how we can build a simple report using just the AOT queries. Now what if we have some logic that needs to be implemented and cannot be achieved using AOT queries?
This is where Report Data Providers plays a significant roles. Let us take the same example of displaying the Customer Id, Name and Balance that was used in post “Build and Deploy Simple Report–Queries”.
We can have this report using Report Data Providers as well. For this, we will keep the query and create three more artifacts, RDP, Report and a new Output menu item.
First we create a Report Data Provider class named “SKL_SampleReportDP”. Do the following:
To create an RDP for a report, we also need a temporary table (if it is Base Provider) or a permanent table (if it is pre process provider).
For this sample, we will use CustTmpAccountSum table that is present in base product.
Here are the class methods
/// <summary>
/// The <c>SKL_SampleReportDP</c> class is the report data provider class for the
/// SKL_SampleSimpleReportQuery report.
/// </summary>
/// <remarks>
/// This is a sample class. Author: Sumit Loya
/// </remarks>
[ SRSReportQueryAttribute (querystr(SKL_SampleCustomer))]
class SKL_SampleReportDP extends SRSReportDataProviderBase
{
CustTmpAccountSum tmpAccountSum;
}
The class declaration contains one attribute “SRSReportQueryAttribute”. This attribute specifies the query that will be used for this report. In case no query is required, this attribute can be removed.
There is one other attribute that can be specified on the RDP class and that is SRSReportParameterAttribute. This attribute defines the contract class that will be used to display report parameters.
processReport method
The processReport method is the entry point for calculating the report data for dataset. Here is the method for our sample class
[SysEntryPointAttribute(false)]
public void processReport()
{
this.insertTmpAccountSum();
}
insertTmpAccountSum method
This is a private method that uses the report query to insert data into the temporary table
/// <summary>
/// This method processes the report query and inserts data into the CustTmpAccountSum temporary table
/// </summary>
private void insertTmpAccountSum()
{
QueryRun queryRun = new QueryRun(this.parmQuery());
CustTable custTable;
while (queryRun.next())
{
custTable = queryRun.get(tableNum(custTable));
tmpAccountSum.AccountNum = custTable.AccountNum;
tmpAccountSum.Txt = custTable.name();
tmpAccountSum.Balance01 = custTable.openBalanceMST();
tmpAccountSum.insert();
}
}
getCustTmpAccountSum method
This method is mandatory as it returns the table buffer that contains the processed report data. The Dataset uses this buffer to bind the table to the dataset.
/// <summary>
/// This method returns the table buffer that contains processed data
/// </summary>
[SRSReportDataSetAttribute(tableStr(CustTmpAccountSum))]
public CustTmpAccountSum getCustTmpAccountSum()
{
select * from tmpAccountSum;
return tmpAccountSum;
}
After creating the class, go ahead and add a new report the existing report model.
- Open the previously created Report Model
- Right click on report model, select Add –> Report. Name the report SKL_SampleReportDP
- Now in the report, go to the Datasets section and create new Dataset using the name CustomerDP
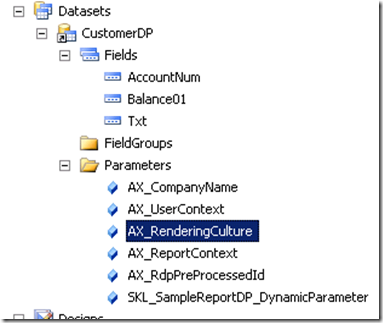
- The parameters for the new Dataset should be as shown below. The Data Source Type is “Report Data Provider”
- In the query property, click the button

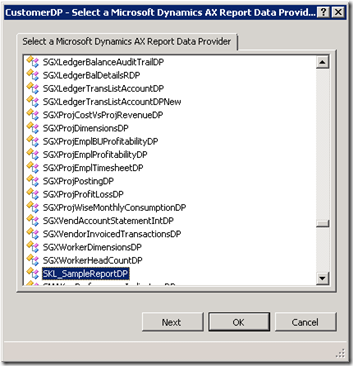
- This opens a box to select a data provider class
- Select the class we created before, SKL_SampleReportDP and click “Next”
- In the next tab, Deselect all fields and just select “AccountNum, Balance01 and Txt” fields
- Click Ok
- This is how the data set looks like
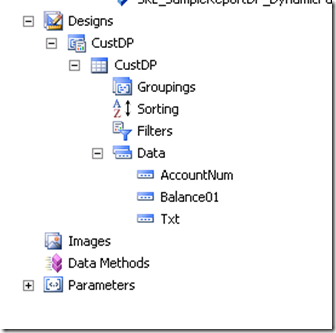
- Now create a new Auto Design as before and name it as CustDP, Select a Layout Template for the report design in Parameters window
- Now right click on newly created design select “Add” and “Table”
- Set following properties
- Name – CustDP
- Dataset – CustomerDP
- Style Template – TableStyleAlternatingRowsTemplate
- You will also notice that the fields are included automatically from Dataset to the “Data” node of the table
- Now right click on the report model and select option “Add SKL_SampleReportProject to AOT”
- Once the report is created back to AOT, go to AX, find the report in AOT –> SSRS Reports –> Reports, right click and deploy using “Deploy Element” option
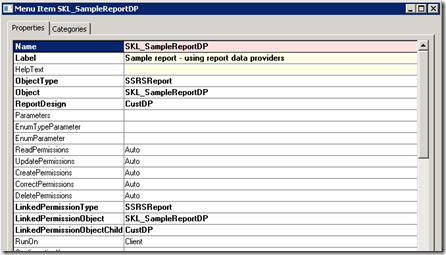
- Once the deployment is successful, create an output type menu item for the report
- Go to AOT –> Menu Items –> Output, Right click and select “New Menu Item”. Set following properties
Now using menu item open and run report. You will notice the same dialog
The report looks like as shown below:


No comments:
Post a Comment
Note: Only a member of this blog may post a comment.